Thursday, February 9, 2012
A Bunny for Shaking
I had the huge priviledge of being asked to contribute a handmade baby item for a basket raffle. The proceeds are going to a team doing the Autism Speaks Walk. I totally respect the gal who is doing the walk with her son and was seriously excited to be able to participate!
I made bunny out of cotton flannel then hand embroidered the face on felt. When I stuffed it I added a cat rattle ball toy thingy that turned it into a rattle. How fun is that?!
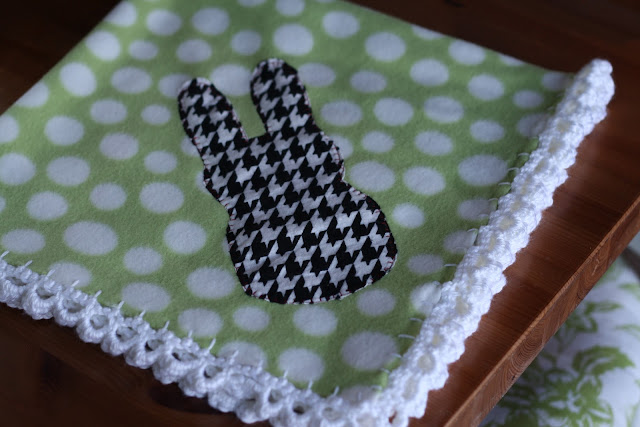
Then, I appliqued one of the left over bunnies onto a super warm fleece and just had to add a crocheted border! How could I not?!
Everybody that wants to knows how to crochet a border on fabric right? There are tons of well written tutorials all over the web, right? Just in case I'm going to give you very brief directions on how to do it.
1. Thread the largest needle that will go thru your fabric with yarn. I used a yarn darner Simply Soft from Caron. If your fabric won't let you push a needle that large through it, use a smaller one and thinner or yarn. You need to thread ALOT of yarn. It takes 5x as much yarn as you have distance to edge. You can tie in more, but it's better to get as much coverage as you can without having to.
2. Run a blanket stitch at equal intervals around the entire edge. I spaced mine at 3/4" but you can do 1/2" and I would on anything smaller. If you don't know how to do a blanket stitch, you can find loads of tutorials on the web. It's not hard once you figure it out, but I am not even going to try to explain it. Find a photo tutorial, you'll get it!
3. Once you've gone all the way around, tie of your yarn to the yarn tail where you started. Make sure this is strong, if it comes out the whole border will fall apart.
4. Single crochet 3x into each stitch along the edge. If your spaces are bigger, use more sc if they are smaller, use fewer. I have found 3 is about right for mine. When you get back to the beginning, slip stitch into the first sc.
5, OK, the following directions are for this scallop edging, if you want something else just follow any edging directions you find and like. Now you are working into sc just like if you were crocheting normally. Here we go: Chain 4, single crochet (sc) into the 4th sc from your chain. Chain 4, sc into the 4th sc from that chain. You got it? You want to create chains that sit just above the single crochet row. If you want more arch then do more chains or go into the 3rd sc from your chain. Work all the way around. sl st into the first chain 4.
6. working into the space created by the chain 4, sc, hdc, dc, hdc, sc. Move to next chain space sc, hdc, dc, hdc, sc. Continue that pattern all the way around, sl st into the beginning ch 4. Fasten off.
Got it! Feel free to comment with any questions.
Now go find something to put a border on! It's so fun.
Subscribe to:
Post Comments (Atom)


^ that doesn't make any sense. But. I love how cute this is. Emmy, you've found your niche with this whole creating business. I love seeing what you come up with next. Good job!
ReplyDeleteThanks Laura! I don't know either, I'm guessing it was my first spam!
ReplyDeleteWow - there are lots of posts for me to catch up on - yay! Just browsing, I see there's a lot to be inspired by. Such great pics of your creations too; that makes all the difference.
ReplyDeleteI don't know if you got my response to you over at my blog, but I was saying that if we lived nearer to each other, the husbands would surely come up with matching outfits or something - their brains seem to be in sync. And speaking of in sync, I've always been Lori Lou or LouLou, since my middle name is Louise. Did we already have this discussion? I dunno, but I see louleelou there on the sidebar. That's fun.
Happy Valentine's Day tomorrow.
Aww thanks Lori! I didn't see your response on your blog, but I totally agree!!
ReplyDeleteI'm not sure if we've talked about it before or not. My "real name" is Emmylou and my sister is Karlee so that's where the LouLee came from. That's funny though. Go team Lou's :)
Happy Valentines Day to you and yours too!